Tuesday, December 4, 2012

Working on my Book

This is soooooo much fun.  For those of you who don't know I am working on a book about - what else- digital printing alternative surfaces.  


My team and I are going to be doing a small test book of a couple chapters, so I am busily finishing several parts of chapters for us to use.  Today I am working on pairing images to surfaces for the second section of the Recycled Chapter. This section of the chapter is about melting plastics and this afternoon I will be precoating the surfaces and sizing images for printing tomorrow. 

I won't be sharing any of the pictures from the book here - you'll have to wait for a copy when my book comes out in the spring of 2013.


If you want to get my latest posts on digital alternative surfaces make sure you visit my Digital Alternative Surfaces site.


This is part of my sister sites Digital Alternative Journaling


and Digital Alternative Studio.

I will be publishing an updated version of my "Wrap it Up: Journals with Style"  The updated version will contain videos interspersed through the book.  It will be available shortly as an iPad version.  Stay tuned on the release!


Friday, October 19, 2012

Back to Blogging

Lots of work going on with my upcoming book.  Digital Printing Alternative Surfaces:the definitive source.  Just finishing the beginning of the chapter on recycled surfaces of which beverage cans are first  This is the set up for printing on my Epson R3000.  A video on placing the cans on the carrier sheet and printing them will appear in the iPad version,  The video is just about done.

Aside from my book I've been a bit busy lately in a good way.  An article was due for both Maggie Grey's Workshop on the Web (December issue) and also Digital Art Creation Magazine.  The DAC magazine is free to read on the web and is also available on the iPad.  iPad versions are free for the next one at least and then you have to purchase it to read it on your iPad.  The iPad version will have videos.  The issue coming out soon I wrote on digital printing on silk and the next one is about digital printing recycled plastics.

Spent some time in Taos and did a keynote and one day workshop for SLMM-the Society of Layerists in Mixed Media.  Pretty long drive from here, but I got to see some of the balloons from the annual Albuquerque Balloon Fiesta while passing through Albuquerque. Very nice.  No pictures though, just looking.

During my drive to and from Taos I listened to the Steve Jobs biography by Walter Isaacson.
I put off reading it for a long time since I heard rumblings of how uncool Steve was.  He is one of my heroes, so I didn't want to get up close and personal with his dark side.  It was a pleasant surprise when I looked at his quirks in another way and was very inspired with how he changed the world.  I loved the book and am reading the actual book now.  He is still one of my heroes. He was truly one of a kind.

So now we come to what I have been doing besides traveling and working on my book for the past month.  I have been putting a type of kit together combining inkAID precoats, fabric that includes an instructional video.  There are 9 fabrics and you can read about them on my Digital Alternative Studio website.


My enews will go out next week between October 23-25 and all the details are in there.  I have combinations of the fabric for sale on my KathyAnne Art site currently, but my video and other information won't be ready until early next week.  If you are on my enews you will be notified right away. 

Feel free to peruse my new sister websites.  Starting with Digital Alternative Surfaces you can see the other sites from inside links.  Or you can just visit- Digital Alternative Studio and Digital Alternative Journaling.   


Wednesday, September 5, 2012

Printers


I have been receiving a lot of emails recently about what printers I suggest.  My favorite has always been Epson's and I have 7 Epson's in my studio.  Why so many?  Because I use them in different ways

Well of course I have my largest and favorite is the Epson 7890.  Beautiful machine and once you figure out the quirks with printing alternative surfaces it is smooth sailing, a pleasure to watch as it prints and even better are the results.  This printer prints 24" wide and is around 225 pounds on the palette when it is delivered, so this or the larger printers take some room and you will need help setting them up.  

The 7890 will print a paper thickness of 1.5mm.  Epson Ultra Chrome K3 ink with Vivid Magenta pigment ink.
The next one down from that is my Epson R3000 (printing beverage cans in the photo).  This is a wonderful art printer work horse.  If I don't need the wider width of the 7890 this is my next go to printer.  Again this is a beautiful machine and has never given me any problems.  It is also the printer I ship to workshops and it has survived students from all over the place and printed constantly for hours at a time in the classroom.  I print all my beverage cans on this one and there is no noise that could be scary.  Some of the reason I can print beverage cans is the paper thickness.  This printer will print a paper thickness of 1.3mm thick around poster board thick.  I always measure my paper thickness before printing.  

This printer uses Epson UltraChrome K3 with Vivid Magenta- pigment ink.  
The Epson R3000 is my choice for entry level art printer.  They have sales on this and the other wide format printers from time to time that could save you some money.


The next  printers currently on the market are in the stylus photo wide format printer category.  I have own one of these printers and do not recommend it at all!!!

The Epson R2880 would be my choice after the R3000.  It was the printer of choice before the R3000 came out.  It has the same inks that the R3000 has and will print a paper thickness of 1.33mm just like the R3000.  The 2880 will take roll paper and print the same as the R3000 13" x 44".  So if you want to save some money it would be the one to get.  


Next is the R2000- the ink is different then the other 2 R Epson printers.  It is Epson UltraChrome Hi-Gloss 2 pigment ink. Again the paper thickness is 1.33mm  I have never printed with the R2880, but I own an R2000. From my personal point of view- skip the R2000 printer.  I have clients and friends with the R2880 and they have never complained to me about the printer.  I think the differences would be with the feel for the printer when you use it. If you are looking for this class of printer that will print 13" wide and 44" long my best is the R3000. The R2880 is a bit less money.
Both the R3000 and the R2000 are wireless and I love that feature on my 3000.  One of the nice things about the 2000 over the 3000 is the change from matte black to photo black.  In the 3000 to switch from glossy to matte of vice versa, you have to purge the other black ink from the lines.  it takes ink and time.  

In the 2000 both black inks are ready to use.  For paper thickness reasons and the way the front feed is undependable in the R2000 makes it the one printer I DO NOT advise artists to buy. I would rather stick to black matte ink and never purge my tanks to do the switch then use the R2000 every day. 

If it were my choice I would choose between the R3000, R2880 and the R2000 I would take either the 3000 or the R2880. Like I said I do know artists that own the R2880 and really like the printer. 
The R2000 will not even print a simple thin cheesecloth skin from the top feed. It scrapes the entire time it is printing. I does not have a platen gap, so you can't change the distance of the print heads from the surface. 


I have not used any of the printers in the Epson Artisan series.  They use dye inks.  Dye inks tend to fade.  Pigment inks stand up. 

 If you want to do any type of quality printing on alternative surfaces.  Your best bet is to do the entry level of the R3000.

You can always contact me about printers, but right now this is pretty much what I would tell you.  
All except that if you notice these are all direct pass through printers.  You will definitely need that to print alternative surfaces.  And don't forget, whatever printer you buy you will be able to learn how to manipulate it for your purposes.

Wednesday, August 22, 2012

Artist Profile Barbara Schneider

Fiber Artist Barbara Schneider 

"My ongoing interest in the Japanese concept of Wabi-Sabi, finding beauty in things that are imperfect, impermanent and incomplete is at the core of all my artwork.  I try to capture the essence of images made of light and movement, images that are in infinitely variable.  What does the eye see? What does the camera see" What does the mind see"

My Leaves series is an exploration and interpretation of natural images by enlarging and reshaping them.  I collect leaves, pods, flowers, grasses and look closely at their structure and shape.  In particular, I like to collect these natural objects at the end of summer when they have begun to wither and fragment.  Enlarging them in my work process allows me to see them as sculptural objects.  I look at the play of light upon surfaces and shaping the pieces introduces a new element-light and shadow interacting with the undulating surfaces."


In the first week of July this year Barbara Schneider spent a week in my workshop in Greenville New York at Hudson River Valley Art/Fiber Workshops.  It was an incredible group of woman who gathered to learn and experiment with digital printing alternative surfaces.  The artist's present were like sponges with the plethora of material thrown at them and the results were many awesome alternative prints. Barbara was no exception as we printed one of her leaf images on several substrates.  


One of the things I loved was the time we had (the workshop was 5 days) as I was able to spend a nice bit of time with everyone in the workshop while their images printed which included time with Barbara, her surfaces and images.  When you start to experiment with alternative surfaces a great place to start is trying the same image on the various substrates.  When you switch images you don't really get an overall view of what can happen in printing the variables. Above you can see Barbara's image on many substrates. Of course it is always hard to see in pictures, but the textures and impact of the image can still be seen.  Barbara made some notes about precoats and surfaces as she worked.
(If you click on the images you will be able to see more detail in the print) 

With her fiber art, Barbara has developed 2 processes that she uses to create her leaf pieces.  These processes and some background on how the concept developed and fits into her overall aesthetic is the content of her new DVD "Three-Dimnesional Fiber Art: Shape & Texture, Light & Shadow"just released.  You can view a snip of her dvd on the same page here.

The video workshop is available for HD and for Standard Video.

You can visit Barbara's website to see more of her work.  It's worth a visit to see her different series and the scope of her work. 


It was wonderful to meet and work with Barbara Schneider.  Her work is interesting, her attention to detail is inspiring and it's exciting to see her DVD first hand!  

Monday, July 23, 2012

Making Videos on Your iPhone

Making videos on my iPhone seems like a great idea.  I know when I want to capture a certain image as I am out and about, my iPhone is usually there and I can take the shot.  There are many apps for photography on your iPhone and Adobe even has a Photoshop Touch app now that is truly excellent to manipulate photos right on your iPhone or iPad.  Last month on my KathyAnne Art site I posted a workshop on Blending Images using the Photoshop Touch app for the iPad.

So I ask myself why not videos on my iPhone?  In my classroom in Texas in February I tried an experiment had some of the students shoot video from my iPhone, so I could edit them and post them for the classes private viewing.  This enabled me to be able to leave the participants with more information then would have been available in class handouts.  In another classroom situation the videos did not turn out as well, but it taught me a lot about how to go about it.

CLICK HERE
Recently I met Jules over the internet on a webinar about his program iPhone Video Hero.  If you click the link in the last sentence it will take you to his site.  It is a bit of a sales pitch, but I have taken his course and it has some really great content.  Plus Jules is accessible and answers email promptly.  If you are interested you should check it out on the CLICK HERE link above.


Here is a short clip of cutting beverage cans from my upcoming book on digital printing alternative surfaces and a video workshop series I am working on.  It's a practice set up from my iPhone 4s.


Friday, June 29, 2012

My Blog Hop Winners

Thanks to everyone who visited and commented on my blog during my part of the Sketchbook Blog Hop.  Remember it's still going on and all you have to do is go to Sue Bleiweiss's blog and see who is doing what next and what prizes are still up for grabs.  I chose randomly from all the entries from 3 blog posts the 2 here and the ones on Inside KathyAnne Art.  That was all due to technical difficulty on the morning of the 27th:) Tanks to all of you for hanging in there with the technical gliche.

I am happy to announce the Nancy won a years membership to KathyAnne Art and Jewels won the Alisa Golden book.  Congrats to both of you.  You'll get an email with details.

Thanks again for playing here.  Come visit any time!!

Wednesday, June 27, 2012

Sketchbook Challenge Blog Hop Take 2

For some reason my comments aren't working and I am not sure why.  My comments are working on www.insidekathyanneart.blogspot.com  Until I can figure it out follow that link and leave me a comment.  I apologize for this and will keep working on this, but since all the settings are correct I am just not sure what is happening.  Read the blog post below for details on the Blog Hop!!

And another update.  Seems like the comments are working fine here so go ahead and leave one:)

For all of you who were trying to figure out how to comment to my actual blog hop post- it is working now.  Look below for a free workshop on KathyAnne Art and how to find the coupon code.

Kathyanne

Sketchbook Challenge Blog Hop


Hello, welcome to The Sketchbook Challenge Blog Hop.  If you make a comment on this blog you will be in the drawing for 2 different prizes.  Winners will be drawn by me on Friday the 29th.  Don't forget you have to make a comment for me to add your name to the qualifiers.

The prizes:

A one year membership to KathyAnne Art worth $35.00.   You will be able to access a new workshop every month as a member and all the monthly workshops that are already on the site.  Also the royalty free images are free to members.  You can visit my Inside KathyAnne Art blog to see workshop descriptions for the member free workshops -


Another prize is the book "Making Handmade Books: 100+Bindings, Structures & Forms by Alisa Golden given away by Art Plantae Today  a $19.95 value.

Now this one if for everyone.  I am giving a coupon for a workshop on my KathyAnne Art site-
Studio Journals Mini Workshop a $15.00 value.  All you have to do is hop on over to Digital Alternative Journaling site to my new post Building Journal Pages on my iPad to get the coupon code.  All the information on how to retrieve the code is in that blog post along with the word to put in the coupon code box in the cart on KathyAnne Art.  Simple as that.

Enjoy some pictures of my project from the book.

It was wonderful to be asked to participate in The Sketchbook Challenge book.  Since my work starts with digital images, all the textures and elements in my Forest Book 2 piece featured in the book are digitals on some type of alternative surfaces.  Elements is the chapter that my work is in.

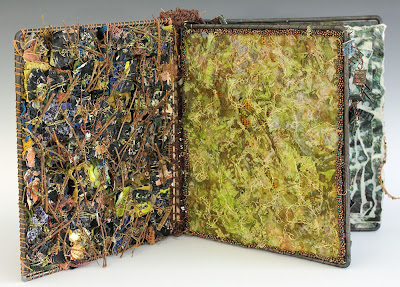
In this image you can see a composition using digitally printed watercolor paper and encaustic on the right.  On the left the page is comprised of digital prints on recycled beverage cans strung on thin hemp and crocheted together before attaching it to the page.

The page on the right is digitally needlepoint canvas with digital prints on lutradur heat distressed and attached to the canvas.  The lutradur has been torn and layered with wire and beads and a border of beads runs around the lutradur composition.  On the left is a mixture of textured elements and a digital print on tyvek.  The tyvek is cut into small pieces and then melted to stack with wire and twigs.

 This part of the sketchbook contains the images and information from my photoshop files.  This is about the watercolor paper prints that were torn and assembled with encaustic in the first picture of my Forest Book 2.
This part of my sketchbook has some pieces of test prints that didn't get into the final project.  It also has pictures of my digitally printers plates that are on one page of Forest Book 2.

Monday, June 18, 2012

Mission:Small Business and KathyAnne Art

I just registered for a $250,00 small business grant and for my application to get considered I have to have 250 people vote for my business.  I would appreciate any of you voting for KathyAnne Art and here's how.   Go to Mission:Small Business and then on the right hand bottom click on Log in and Support.  You can log in with your facebook log in.  Then under Vote Local!  Type in Kathyanne Art under the business name  and you will be able to click vote.  That's all there is to it.


Sunday, June 17, 2012

Digital Prints on Recycled Beverage Cans and Crochet

Needle arts have always been a major part of my art life.  I learned to crochet when I was 7 and made a ripple afghan that was anything but exact in the ripple department.  It was pretty pitiful, but it was so much fun I didn't worry if the ripples were a mess.  Much later in the 70's crochet was popular so there were always plenty of patterns around for me to make endless pieces in crochet.  Now I tend to leave patterns behind and just figure it out and crochet when the inspiration hits.

Today I still always have a crochet project going and when it comes to assembling my beverage can digital prints, I crochet pieces together.   Yesterday Kathryn who blogs (on her website)  Crochet Concupiscence sent me an email to tell my a piece of my crochet work was highlighted on her blog "20 Creative Things a Crocheter Can Do With Paper" You can see my piece and others in her post.

This got me to thinking how much crochet I have been doing in the last couple of weeks with my beverage cans so I thought I would share a bunch of pieces front and back and then show you how I start these pieces.  They are labor intensive and a bit wearing on your hands, but rewarding.  These pieces are small, nothing larger then 12" x 12".
Detail 
 Front
Back  
The general plan with these pieces are to string the can pieces and crochet together. 
Many of the pieces are then secured to a piece of hardware cloth so they can be hung.
 Front 12" x 12" piece
 Detail
 Detail of back
Back
You can see I started with a small square and then crocheted the rest of the rows around the square.  I
approached the first piece on the page the same way.
 This piece rolls together and can be hung in the round.  It is 8" x 20"
This would actually be the inside of the piece since it naturally rolls together.
 This piece is 10" x 16" with the height of 2.5"- the loops of the beverage can are rather long.
This is the back:)

Now let's see how they all start-  
I print the beverage cans- you can actually find my ebook on printing beverage cans on my kathyanne art site the title is The Complete Guide to Digital Printing and Assembling Beverage Cans.  It is also available on Nook and Kindle.  

After the cans are printed and varnished and ready to go I cut them in the size pieces for the project - punch holes and then string them onto colored hemp.
When I string the cans I don't put tons on.  As I want to add can pieces I just cut the hemp, add pieces then tie the hemp back to the piece and crochet.  So as you see in the pic above I chain stitched and then I crochet the pieces into the crochet chain.
Every other row I crochet without can pieces.  Otherwise it is totally unruly and there is no room for the cans.  As it is I pack them in.

Please visit my Digital Alternative Sites to get more information on digital printing.  These sister sites are about my digital alternative print processes. 

These sites also have tutorials.  They are new sites and I am in the process of building the content on them.

Monday, June 4, 2012

The Sketchbook Challenge

Well it's almost here "The Sketchbook Challenge" a book by Sue Bleiweiss.  My piece Forest Book 2 is included in this wonderful book as well as the studio journal mapping the creation of my project.  I will be excited to see the book and will probably only have to wait a few more days for my copy. 

There is some exciting news since there will be a blog hop among the artists (this includes me) who have work in Sue's book. The blog hop celebration starts June 25th and ends July 10th.  There are $1200 worth of prizes that will be given away from the artists participating.  Winners will be drawn randomly from comments on the posts during the blog hop.  Each artist will chose people from their comments for the prizes they will give away.  For more information see Sue's blog post today.

My piece is of course composed of many digital prints and then assembled on 6 pages 10" x 12" to complete the Forest Book.  Each page is a separate creation containing digital prints on surfaces such as lutradur, metal printers plates, watercolor paper, beverage cans and more.  Encaustic and crochet  is used as well as other techniques in the assemblages of the pages.    More to come as we gear up for the blog hop.

Oh and before I forget I will be giving away a  years membership to KathyAnne Art, my member website.  The value of this is $35.00, but the beauty of it is the over 700 royalty free images and the monthly workshops that currently total over 40 with new ones every month.  Remember to visit here on June 27th and comment on my post to get your chance to win.  The winner will be drawn from the comments on the blog post from the blog hop.

Also I will have a free coupon code for the workshop on my KathyAnne Art site that was created based on my studio journal seen in the Sketchbook Challenge book.  Anyone who reads my blog that day will be able to find that coupon code from a url I will post and then download and enjoy their free workshop.  You can access the workshop description for "Studio Journals Mini Workshop" on my Inside KathyAnne Art Blog.

I also have another give away- Making Handmade Books: 100+ Bindings, Structures & Forms by Alisa Golden Total retail value $19.95!  

Be sure to join all of us as we celebrate the release of Sue's book!
Forest Book 2  Front and Back Cover

Detail shots below


Monday, May 14, 2012

HOORAY, it's Monday!

One of my favorite things about Monday right now is that no matter how much I have to do or what state my studio and work is- I go to an hour and 15 minute  yoga class at Bend Yoga here in Prescott.  They only opened months ago and since I love hot yoga and could take classes only when I traveled- I was really excited to see they were here.  So I started with 2 days a week, went to 3 and now a couple weeks ago added Mondays!!!  I am back in my studio now and ready to start my day and although I worked my butt off for a bit earlier- I am energized and flowing creative energy.

On the agenda, more writing-  I have started my book on digitally printing alternative surfaces. For today I will finish the chapter on my 6 printers so readers can see just how I use all my printing tools.   This book will be crammed full of all sorts of information on my digital printing process.  I will do complete how to's on surfaces I have been creating and sharing and some new.  There will be information on printing with all 6 of my printers so surfaces will be designed for non-art printers also.  Coming up when I have finalized my table of contents I will post it.

Front of a cheesecloth skin.  The image is a detail of one of my digital mixed media pieces on slightly dyed yellow cheesecloth.
This shows the back of the above print on a cheesecloth skin.  The yellow tone of the dyed cheesecloth is visible as the base of the print.

Wednesday, April 25, 2012

JuliAnne Kaplan- Photographer


I’d like to introduce a professional photographer out of San Rafael California, JuliAnne Kaplan.  
About her work JuliAnne says  "My work is typically abstract and minimalist using natural lighting to highlight color and texture.  


JuliAnne contacted me at the end of 2010 to make plans for a one on one workshop in my studio in February 2011.  I had seen some of JuliAnne’s photography by visiting her website and was drawn to her interesting photographic world.  Her photographs lend themselves to all sorts of alternative surfaces.  What I didn’t know about JuliAnne was that she was a bit conservative in many ways and somewhat timid.  What I mean by this is that JuliAnne likes to structure her world a bit and my out of the box approach was an entirely new way for her to think.

Well think she did and in returning home she was so excited about what she had learned she immediately purchased a new Epson 7890. JuliAnne also got many of the supplies together she would need to embark on this new endeavor of digital printing alternative surfaces.  Now we need to dial it forward a year to 2012 and the ink still hadn’t been removed from the plastic packages and her printer was (after it being in a box in the garage for awhile) just freshly put together and in plastic in the corner of her computer studio. 
Luckily I was on my way to San Francisco to participate in a workshop and JuliAnne was in the need of getting her studio put together in such a way as she could actually print.  It was like a match made in heaven since I was available to spend some time setting up her printers and getting everything set so she could print alternative surfaces.  


If you visit my Digital Alternative Journaling site, you will be able to read the pages of my iPad journal about our journey through some of the set up and the significant results we had digitally printing some incredible surfaces. It was one of those- you had to be there, but humor was a LARGE part of our time together and both of us smile each time we think about our experience.  Three pages of my journal are posted from April 5, April 6 and April 9.  (You can click on each date to take you to the individual posts.)

Ms. Kaplan recently told me “the work you do has been the BEST THERAPY I have ever had!  I’m even learning how NOT to make my bed in the morning!!!  Your one-on-one workshops have really helped to stretch my comfort zone and as a result, I am quickly seeing and entirely new phase of my works emerge after shooting since 1970....”  
Visit JuliAnne’s website to get familiar with her photography.  Some of her work will appear in my upcoming book about digital printing alternative surfaces.